Home Watering Design Made Simple

When it comes to watering your garden there is never a right or wrong answer how we will try and give you some ideas on how we water our garden. We will also discuss the different types of systems that we use as well as automation and maintenances.
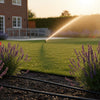
We have a large garden that wraps around the house, it consists of a few hedges and pots around the front of the house. The rear of the house has a large lawn area with strip borders, few large trees and a a few densely planted areas.
We have a tap at the front of the house and one at the back, our water pressure is about 3 bar, which is average for the UK and a reasonable flow rate.
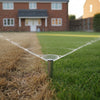
For the front of the house, we have decided to run this on a single zone, that covers the hedges and pots.
We have a single Hozelock timer connected to the outside tap, we then have an Anti-Leak tap adapter that connects the irrigation pipe to the tap timer. We have run 15 meters of main supply pipe to the areas that we need to water. We used a few allow connectors to make the pipe neat and tidy against the wall and secured with a few hose cleats.
We then transition from the Main supply hose to the dripper hose with an Anti-Leak joiner, this helps transition from one hose type to the other. We then run the drip line hose past everything that needs to be watered. We then secure the pipe to the ground with some hold down stakes. The drip line is the same diameter as the supply hose and has integrated dripper’s interstates along its length. At the end of the hose, we added a stop connector that helps pressurise the system and can easily be removed for flushing the system at the end of the season.
We also have a few pots that need to be watered, these are along the length of the main supply hose. We have cut the pipe near the pots that need to be watered and use some 4mm micro hose of the connector and we have run it to all the pots.
When we get to a pot we cut the micro hose, add an inline stake dripper and then continue the pipe out of the dripper to the next pot. We have about 10 pots in total, so we use an inline stakes dripper for 9 of the pots and then an end of line dripper for the last one.
To test the system, we put it into manual watering mode, we can hear the air being forced out the system and then it pressurises. We check for leak’s and then adjust the stake drippers to ensure they all emit the same amount of water. We then check the end of the drip line pipe to ensure the water is getting to the end of the pipe. If it’s not, then we know we have the stake dripper’s allowing too much water out. We reduce their output by twisting the top of the dripper’s, this forces the rest of the water down the other pipe. It’s all now tested and ready to set the automatic timer.
Below is a list of the items we used:
1x 50 Meters of Drip Line 13mm
1 x 10 Meters of Micro Hose 4mm
10 x Inline Stake Adjustable Dripper's
1 x End Of Line Stake Adjustable dripper.
10 x Hose Cleat’s
20 x Hold Down Stake’s
`