
Hozelock 4mm Hose: The Expert Guide to Micro Irrigation in 2026

Last July, a dedicated gardener in Kent discovered that even the most expensive prize-winning plants can't survive a single loose fitting on their hozelock 4mm hose popping off while they're away on holiday. It's a frustrating reality when an irrigation system fails just when it's needed most. We agree that achieving a perfectly balanced flow between your main supply and your delicate patio pots often feels like a constant battle against water pressure. You shouldn't have to worry about uneven watering or messy leaks ruining your garden display.
You deserve a system that's both discreet and dependable. As specialists who focus exclusively on Hozelock systems, we've spent over 15 years helping UK gardeners solve these exact technical challenges. This expert guide will show you how to master your micro irrigation setup to eliminate popping fittings and ensure even water distribution across every container. We'll explore the specific roles of 4mm versus 13mm piping and provide the professional planning steps you need for a lush, thriving garden in 2026.
Key Takeaways
- Learn how to design a professional "Main and Branch" layout, using the hozelock 4mm hose as the essential secondary line to deliver water precisely to your drippers.
- Understand the technical specifications of UV-stabilised PVC to ensure your irrigation system remains durable and leak-free against the unpredictable UK weather.
- Master expert installation techniques, such as using warm water for effortless connections and calculating flow rates to keep your plants lush and healthy.
- Discover essential seasonal maintenance tips to protect your micro-tubing from frost damage, ensuring your irrigation investment lasts for years to come.
The Fundamentals of Hozelock 4mm Micro Hose
Understanding the basics of your garden setup is the first step to a thriving outdoor space. The hozelock 4mm hose, often referred to as micro tube, acts as the vital secondary delivery line in a professional irrigation layout. It's designed to branch off from your 13mm main supply pipe, carrying water directly to individual plants. This system is the backbone of modern drip irrigation, ensuring every drop reaches the root zone without waste.
You'll find this tubing particularly useful for delicate areas like hanging baskets, window boxes, or patio pots. Because it's only 4mm wide, it remains incredibly discreet and can be tucked behind foliage or along mortar lines. Hozelock backs this product with a 2-year guarantee, which serves as a benchmark for reliability in the UK gardening market. This peace of mind is essential when you're relying on automated systems to keep your plants healthy while you're away.
To better understand how these components integrate within a wider watering setup, watch this helpful video:
Why Choose Hozelock 4mm Tube Over Generic Alternatives?
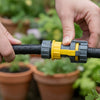
We specialise exclusively in Hozelock Garden Irrigation because we know the components are designed to work together perfectly. Generic alternatives often use stiff Polyethylene (PE) which is difficult to manipulate around corners. Hozelock uses high-quality PVC that stays flexible even in colder UK temperatures. This flexibility makes installation much easier. The specific internal diameter is engineered to provide a snug, leak-free fit with Hozelock connectors. Choosing brand-compatible parts prevents the common frustration of "pop-offs" when the water pressure spikes during a cycle.
The Anatomy of a Micro Irrigation Pipeline
Building a reliable system requires a logical flow. Your water's journey starts at the tap, usually passing through a battery-operated timer. From there, it travels through a 13mm supply tube that acts as the artery of your garden. The hozelock 4mm hose then branches off to serve as the capillary, delivering water to the end-of-line drippers. This tiered structure maintains consistent pressure across the whole garden. For a deeper dive into planning your layout, check out our Hozelock Automatic Watering System: The Ultimate 2026 UK Guide.
- Supply Tube (13mm): The main line that carries high volumes of water.
- Micro Tube (4mm): The flexible branch that reaches specific pots or baskets.
- End-of-line Drippers: The final component that regulates the water flow to the soil.
Understanding Technical Specifications and UK Compliance
The hozelock 4mm hose serves as the essential delivery line for precise watering. It's manufactured from high-quality, UV-stabilised PVC. This material is specifically engineered to handle the UK's unpredictable weather patterns. Whether your garden faces a sharp February frost at -10°C or a record-breaking summer heatwave of 40°C, the hose maintains its structural integrity without cracking or softening excessively.
Understanding the measurements is vital for a leak-free system. The 4mm specification refers to the internal diameter (the bore) of the pipe. This ensures a snug, airtight fit over Hozelock's standard 4mm barbed connectors and stakes. While the external diameter is typically around 6mm to 7mm, it's the internal 4mm fit that prevents the "blow-offs" often seen with inferior, generic piping under high water pressure.
UV Stability and Material Longevity
UV inhibitors are integrated into the PVC during the extrusion process. These additives act like a high-factor sunscreen for your irrigation system. They prevent the sun's ultraviolet rays from breaking down the plastic polymers, which would otherwise lead to the hose becoming brittle and snapping. In the UK, where sun exposure can be surprisingly intense on south-facing patios, this protection extends the life of your system by several years.
The opaque black finish of the hozelock 4mm hose isn't just a design choice. It's a functional necessity that blocks all light from reaching the water inside the tube. This effectively stops the growth of algae. Without this light-blocking feature, algae would quickly bloom inside the pipe and clog your delicate drippers. The material's inherent flexibility also makes it easy to navigate the tight corners of greenhouse staging or tiered planters without the risk of kinking and cutting off the water supply.
Micro Irrigation and UK Hosepipe Ban Regulations
As water scarcity becomes a more frequent concern, understanding local regulations is essential for every gardener. In 2026, most UK water providers continue to recognise the efficiency of micro-drip systems. During Temporary Use Bans, often called hosepipe bans, many authorities allow the use of "drip irrigation systems fitted with a pressure reducing valve and a timer." These systems are seen as a responsible choice because they deliver water directly to the roots with minimal waste.
Because microirrigation design and installation focuses on targeted delivery, it can reduce garden water consumption by up to 90% compared to using a traditional hose and spray gun. We recommend checking the specific wording on your water provider's website, such as Thames Water or Anglian Water, as they occasionally update their definitions of "dripper" exemptions. If you are planning a new layout, you can browse our full range of Hozelock watering solutions to ensure your garden stays lush while remaining fully compliant with local water restrictions.
Planning Your Micro Irrigation Layout with 4mm Hose
Creating a reliable watering system requires a strategic approach known as the "Main and Branch" method. You should never run a hozelock 4mm hose directly from your outdoor tap. Because 4mm tubing has a narrow internal diameter, connecting it to high-pressure mains water causes immediate friction loss and often leads to the pipe popping off the connector. Instead, use a 13mm supply pipe as your "main" artery to carry the bulk volume of water around the garden, then use the 4mm hose as "branches" to reach individual pots or plants.
To ensure every plant receives the right amount of moisture, you must respect the physical limits of the equipment. A single branch of 4mm hose should stay under 5 metres in length. If you exceed this distance, the water pressure at the end of the line drops significantly, leaving the final plants in the row thirsty. For a standard layout, one 4mm branch can comfortably support 5 drippers if they are rated at 4 litres per hour. Understanding these fundamentals of micro-irrigation ensures your system remains efficient and your plants stay healthy throughout the summer.
- Patio Pots: Run a 13mm pipe behind the pots and use short 4mm offshoots for a discreet look.
- Flower Beds: Use 4mm hose to snake between densely planted perennials where larger pipes won't fit.
- Hanging Baskets: Secure 4mm tubing up a wall or bracket to deliver water directly to the basket's reservoir.
Connecting 4mm Hose to a 13mm Supply Pipe
Transitioning from your main supply to your micro-tubing is simple with the right tools. Use the Hozelock Key Punch to create a precise, 4mm hole in your 13mm pipe. This tool is designed to prevent jagged edges that cause leaks. Once the hole is made, insert a 4mm joiner or a 13mm-to-4mm reducer. This creates a watertight seal that handles the transition of pressure perfectly. You can find all the necessary adapters and joiners in our collection of Hozelock Connectors to keep your system secure.
Pressure Management in 4mm Systems
Pressure reducers are essential components for any micro-irrigation setup. Standard UK mains pressure is often too high for the delicate wall thickness of a hozelock 4mm hose, which can lead to split pipes or flying emitters. A pressure reducer at the tap brings the flow down to a constant 1.5 bar, which is the "sweet spot" for micro-tubing. If your garden has different levels, use flow control valves on each branch to balance the output. Water naturally flows more heavily to the lowest point of your garden due to the gravity effect, so you'll need to restrict the flow to lower pots to ensure elevated baskets get their fair share.
Practical Installation Tips and Troubleshooting
Installing a hozelock 4mm hose shouldn't be a struggle. If you find pushing connectors into the pipe difficult, don't force it. Keep a thermos of warm water nearby while you work. Dipping the end of the hose into the water for 30 seconds softens the PVC, allowing the barb to slide in easily. once the plastic cools, it shrinks back to create a professional-grade seal that won't budge under pressure.
Accuracy matters during the setup. Use sharp garden snips to ensure a perfectly square end on every cut. An angled or jagged cut often leads to gaps inside the connector, which is the primary cause of slow drips at the joint. After laying your line, use 4mm stakes every 50cm. This prevents "hose creep," a common issue where temperature changes cause the pipe to expand and contract, potentially pulling drippers out of pots or creating trip hazards across garden paths.
If a joint keeps blowing out, you've likely exceeded the system's pressure capacity. Hozelock systems usually operate best between 1.5 and 2 bar. Check your pressure reducer first to ensure it's functioning. If the pressure is correct, ensure the hose is pushed fully over the second barb of the fitting. A half-seated connection will eventually fail when the sun warms the pipe and the water pressure spikes.
Solving Common Leaks and Blockages
Blockages usually happen at the dripper rather than in the pipe itself. If the hose feels firm but no water comes out, the emitter is likely clogged with limescale or fine debris. You can often clear this by gently tapping the dripper or soaking it in a mild descaled solution. To prevent future issues, follow these steps:
- Always flush your system for 60 seconds before attaching end-caps to clear out grit.
- Check for kinks where the hose transitions from a main supply pipe to a container.
- Inspect the 4mm line for internal algae growth if using a water butt.
For more detailed diagnostic help, read our guide on Troubleshooting Your Hozelock Irrigation System.
Discreet Installation: Burial and Routing
You don't have to leave your hozelock 4mm hose visible across your mulch or lawn. You can safely bury it up to 5cm deep in flower beds to keep the focus on your plants. For patios and balconies, route the line behind downpipes or along the underside of trellis frames to keep the installation invisible. Use 4mm wall clips to secure the hose to brickwork or timber, ensuring a tidy, permanent finish that withstands the UK winter without sagging.
Selecting and Maintaining Your Hozelock 4mm System
Choosing the right length of hozelock 4mm hose is the first step toward a successful micro irrigation setup. We typically offer 10m coils for small balcony projects or targeted watering for five to ten pots. If you're planning a larger border or a complex greenhouse layout, the 25m coil provides better value and flexibility. It's always better to have a few metres of spare pipe in the shed than to run short mid-way through your installation.
Expanding your system is simple, but you must respect the flow limits of micro-tubing. A single 4mm line shouldn't exceed 30 individual drippers. If you add more pots and notice the last few aren't dripping, you've likely exceeded the pressure capacity. To fix this, run a secondary line from your main 13mm supply pipe rather than extending the existing 4mm micro-tube. This ensures every plant receives the same amount of water to help your garden thrive.
Winterising Your 4mm Micro Irrigation
UK winters can be harsh on irrigation components. Water left inside the pipework expands by approximately 9% when it freezes, which is the primary cause of split tubing. Use the "Drain Down" method by disconnecting the hose from the tap and letting gravity remove any standing water. This prevents ice expansion from damaging your hozelock 4mm hose or popping your connectors out of place.
You should always store your water timers and pressure reducers indoors during the dormant season. The internal valves are sensitive to frost and can crack if left outside in sub-zero temperatures. During the winter, check your remaining pipework for animal damage. Squirrels and mice occasionally chew on micro-tubing when water sources are frozen; identifying these small punctures early saves you from messy leaks when you restart the system in spring.
The Specialist Advantage at Garden Watering
We've spent over 15 years specialising exclusively in Hozelock systems. This isn't just a business for us; it's our passion. While general DIY stores often stock a limited range of basic kits, we provide the full technical inventory and the expert knowledge required to build a professional-grade system. We understand exactly what your garden needs to stay lush and healthy with minimal effort.
If you're unsure where to start, you can access our Design Ideas and Plans for custom garden layouts. These resources help you calculate exactly how many connectors and metres of hose you need for your specific space. We're more than just an online store; we're your trusted irrigation partner, providing expert advice you can trust.
Ready to upgrade your garden? Shop the full Hozelock 4mm Hose range here and ensure your plants get the precision care they deserve.
Master Your Garden Watering for 2026 and Beyond
Installing a precision system is the smartest way to keep your plants healthy while cutting down on water waste. The hozelock 4mm hose provides the essential flexibility needed for intricate layouts; it's perfect for hanging baskets and dense flower beds where larger pipes simply won't fit. By following the technical layout principles we've covered, you'll ensure consistent pressure across your entire garden. This prevents the common issue of dry spots in your furthest containers.
We've spent over 15 years as exclusive Hozelock experts; we understand exactly what's required to build a system that lasts. Our team offers 5-star rated UK customer support to help you get every connection right the first time. We don't just sell parts; we provide the specialist knowledge you need to make your garden thrive with minimal effort. It's time to stop lugging heavy watering cans and start enjoying a more efficient, lush outdoor space.
Browse our full range of Hozelock 4mm Hose and Micro Irrigation Kits
We're ready to help you create the perfect watering solution for your home.
Frequently Asked Questions
Can I connect Hozelock 4mm hose directly to my outside tap?
You cannot connect Hozelock 4mm hose directly to a standard outside tap because the water pressure is too high for the small diameter. Instead, you must use a pressure reducer or a 13mm supply pipe as the main carrier. This ensures the micro irrigation system operates at the recommended 1.5 bar pressure, preventing leaks and bursts in your garden setup.
What is the maximum length I can run a single piece of 4mm micro hose?
You should limit a single run of 4mm micro hose to a maximum of 30 metres to maintain consistent water pressure. If you exceed this length or attach more than 30 drippers to one line, the plants at the end won't receive enough water. For larger gardens, use a 13mm supply pipe as a backbone and branch off with shorter 4mm lengths to ensure every pot stays hydrated.
How do I stop my 4mm hose from popping off the connectors?
The most effective way to stop your hose popping off is to install a Hozelock Pressure Regulator at the tap to keep levels at 1.5 bar. You should also dip the end of the hozelock 4mm hose in a cup of hot water for 30 seconds before pushing it onto the connector. This softens the plastic, allowing it to form a tighter, more secure seal as it cools and contracts.
Can Hozelock 4mm hose be buried underground?
You can bury Hozelock 4mm hose under a thin layer of mulch or bark, but burying it deep in soil isn't recommended. Soil weight can easily crush the narrow tube, and roots from nearby plants often seek out the water source and clog the drippers. For a discreet look, keep the 4mm pipe on the surface and hide it with 50mm of organic matter or decorative stones.
Is Hozelock 4mm hose compatible with other brands of drippers?
Yes, Hozelock 4mm hose is compatible with most other major irrigation brands like Claber or Rain Bird that use standard 4mm internal diameter fittings. This universal sizing allows you to mix and match components to suit your specific garden needs. We've found that 95% of micro irrigation components sold in the UK use this standard size, making it easy to expand your existing watering system.
How do I punch a hole in the 13mm pipe to attach the 4mm hose?
You should use a dedicated Hozelock Hole Punch or the 4-in-1 installation tool to create a clean, precise opening in the 13mm supply pipe. Simply press the tool into the pipe until you hear a click, then insert the 4mm connector or dripper directly into the hole. Avoid using a drill bit or a knife, as these create irregular shapes that lead to leaks in 80% of DIY installations.
Will my 4mm hose split if it freezes during winter?
Your hozelock 4mm hose is unlikely to split if you drain the system before the first frost arrives in November. While the high-quality UV-stabilised plastic is durable, trapped water expanding into ice can cause the pipe to stretch or the connectors to pop. We recommend using a drainage valve at the lowest point of your system to automatically empty the lines when the tap is turned off.
What is the difference between Hozelock 4mm Micro Tube and 13mm Supply Pipe?
The 13mm supply pipe acts as the main artery of your system, carrying large volumes of water around the garden with minimal pressure loss. In contrast, the 4mm micro tube is a branch line used to deliver water from the main pipe to individual pots or plants. Think of the 13mm pipe as the motorway and the 4mm hose as the driveway that leads directly to your plants' roots.
`-
Posted in
hozelock 4mm hose