Hozelock Starter Kit Guide: Choose with Confidence
The biggest Hozelock starter kit isn’t necessarily the best fit for your garden. The right choice depends on what you’re watering and how your space is arranged. This hozelock starter kit selection guide for beginners starts with your plants, not the product descriptions.
If terms such as drip irrigation, timer and connectors feel unfamiliar, it’s natural to wonder whether a kit will suit your water supply or leave room to expand. Consider those details before choosing. This guide explains how to identify a watering method for your plants, what to check before you buy and how to plan a system around your needs.
We’ll look at how pots, borders and lawns affect your options, what to consider about your garden layout and water connection, and where timers and add-on components may fit. With more than 15 years of experience advising on irrigation, Garden Watering offers practical guidance to help you make an informed first choice.
Key Takeaways
- Compare drip, container and sprinkler watering by the area and plants each method needs to cover.
- Assess your water source, distances, watering zones and the kit’s exact contents before choosing.
- Use four practical steps to narrow your options, from mapping your garden to comparing kit contents.
- Choose a manageable first system, then test how well it reaches your plants before refining the schedule.
- Plan separate watering zones when different parts of your garden, from patio pots to a lawn, need different methods.
What should a beginner expect from a Hozelock starter kit?
A garden watering starter kit brings together components for a particular watering task, so you can set up a basic system without selecting every part separately. Contents vary by kit and purpose. Start by identifying the plants you have, where they grow and how you want to water them.
That’s the key to choosing a Hozelock starter kit: define the garden’s watering jobs, then compare the products. A drip system can deliver water to individual plants, pots or borders, while a sprinkler-based approach is generally suited to a lawn. Hozelock makes a range of watering products; you can read more about the maker in this overview of Hozelock company history.
For a quick introduction to Hozelock watering, watch this beginner’s guide:
Which garden watering jobs might a starter kit handle?
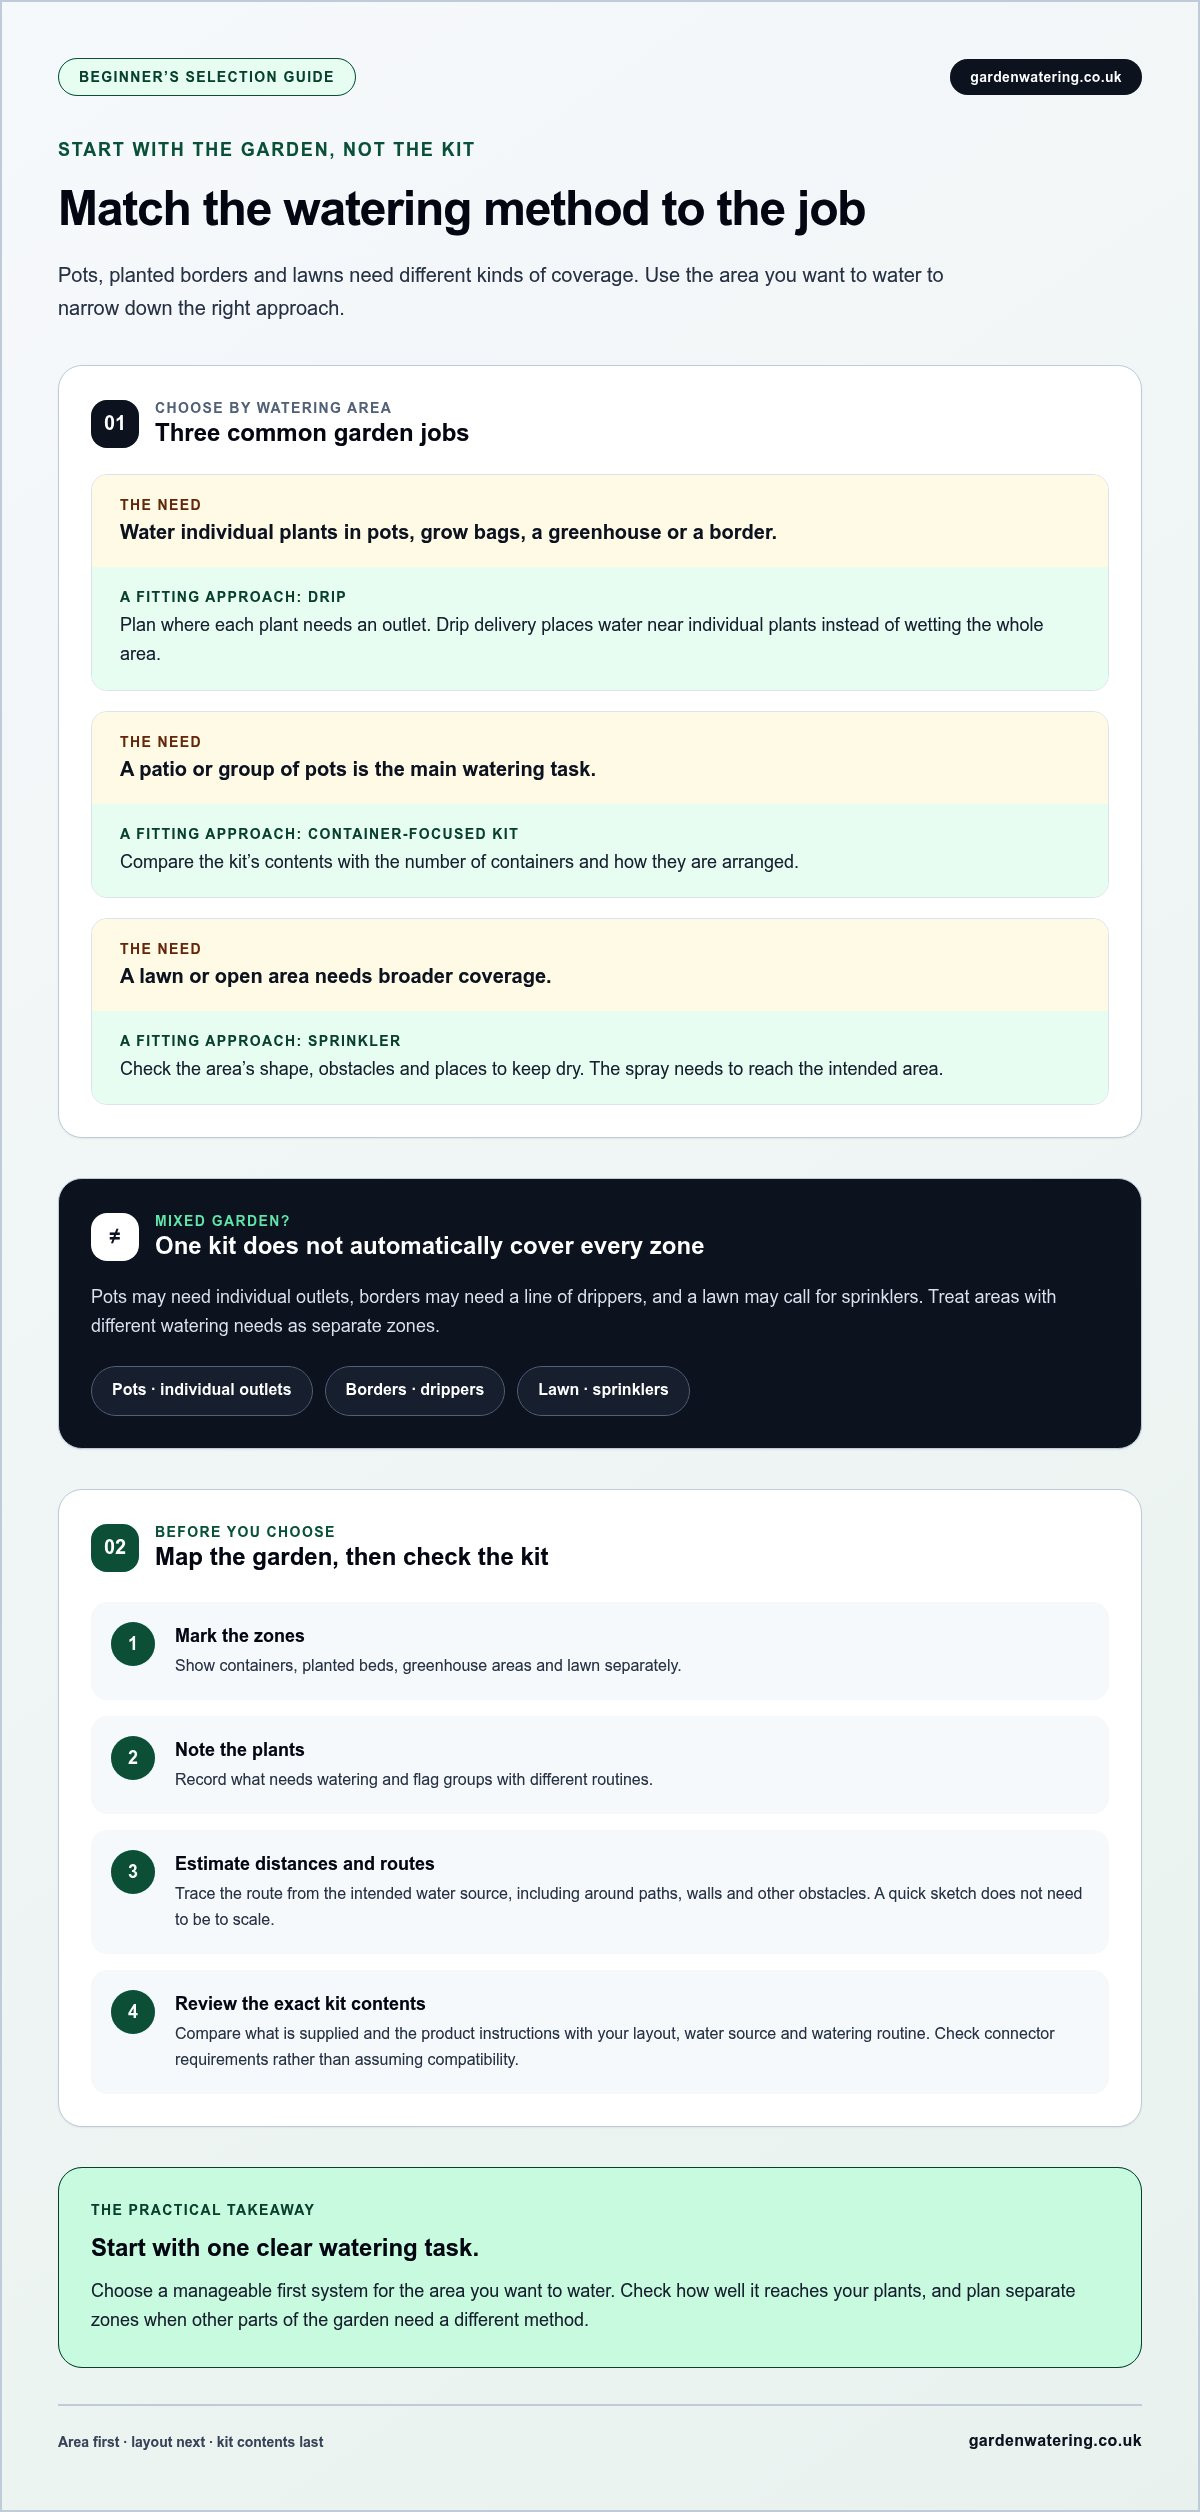
List the areas you want to water. Patio containers, greenhouse plants and planted borders may benefit from targeted watering, while a lawn needs a different kind of coverage. One garden can have several zones: pots may need individual outlets, borders may need a line of drippers, and a lawn may call for sprinklers. A Hozelock watering kit can be a manageable way to start with one of these jobs.
What should first-time buyers not assume?
Don’t assume every kit includes the same parts, suits the same number of plants or covers every area in your garden. Compare the specific kit’s contents and instructions with your layout, water source and watering routine. Check the product guidance for connector and component requirements rather than assuming compatibility. A starter setup is designed for a particular task, not automatically a complete irrigation layout for the whole garden.
Keep your first goal simple: choose the main watering task you want to make easier. If your plants and spaces have different needs, treat them as separate zones and consider how each should be watered. This makes it easier to choose a kit for your garden now without expecting one setup to solve every watering challenge.
Drip, container or sprinkler kit: which Hozelock approach fits?
The right watering method depends on what needs water and how the area is arranged. Drip systems deliver water at individual plants, container-focused kits suit pots, and sprinklers cover a broader area. Compare the options by the job you need to do, rather than expecting one kit to suit every plant.
| Watering method | Best-fit garden area | Main consideration | Beginner suitability |
|---|---|---|---|
| Drip | Pots, grow bags, greenhouses and planted borders | Plan where each plant needs a water outlet | A clear option for targeted watering |
| Container-focused kit | A patio or group of pots | Compare the kit’s contents with the number and arrangement of containers | Useful when pots are the main watering job |
| Sprinkler | Lawns and more open areas | Consider shape, obstacles and areas to keep dry | Can suit broad coverage if the spray reaches the intended area |
When is a drip watering kit a sensible starting point?
Consider drip watering for plants in pots, grow bags, a greenhouse or a border. Rather than wetting a whole area, a drip system places outlets near plants, letting you plan water delivery around their positions. Explore garden drip irrigation systems and compare the product instructions with your layout. Check where the plants sit and how the system can reach them from the water source.
When should beginners consider a sprinkler-based setup?
A sprinkler may suit a lawn or a larger open area where broad coverage is useful. Sketch the space and note its shape, paths, trees and other obstacles, as well as beds or seating areas you want to keep dry. One spray pattern may not suit every layout, so consider where the water needs to land before choosing a system.
Mixed gardens often have different watering jobs. You might use drip delivery for pots and borders, and a sprinkler for the lawn, rather than asking one kit to cover every zone. Browse Hozelock watering kits, then match the kit’s purpose and instructions to the area you want to water first.
What should you check before choosing a Hozelock starter kit?
A kit is most useful when its intended job matches your garden. Before choosing, map where the water needs to go and check what the kit contains. Use this checklist to spot mismatches before they become setup frustrations.
How do you map your garden's watering needs?
Draw a quick sketch and mark each watering area separately. It doesn’t need to be to scale. Approximate distances and routes are enough to compare your layout with the kit instructions.
- 1. Mark the zones: show containers, planted beds, greenhouse areas and lawn separately.
- 2. Note the plants: record which plants need watering and flag groups with different routines so you can plan separate zones.
- 3. Estimate the distances: mark the route from your intended water source to each area, including runs around paths, walls or other obstacles.
Your sketch will show whether you’re choosing for one focused job or several different areas. Use it as a reference when reviewing the kit’s stated coverage and setup guidance.
How can you check water access and kit contents?
Identify the water source you plan to use, then trace how a hose or system would reach the plants. Check your tap and hose connection, as connector requirements depend on the equipment you have and the fittings supplied with the specific kit. The Hozelock connectors and fittings range shows the connection options available.
- 4. Review the exact contents: compare the listed connectors, tubing and outlets with the route and zones on your sketch.
- 5. Check the instructions: look for the intended watering use, any stated plant quantity, and guidance on connections or layout. Don’t assume one kit’s details apply to another.
Before choosing, sketch each watering zone, estimate the route and distances from your water source, note the plants’ needs, then compare the kit’s contents and instructions with that plan. When the intended use, connections and layout align, you’ll have a clearer basis for choosing a manageable first setup.
How do you match a beginner kit to your garden and routine?
A good first kit should fit both your garden’s layout and the time you have for watering. Use this four-step process to narrow your options, then start with the area that would benefit most. Turn your plants and routine into a clear checklist before you compare products.
- Map the garden. Sketch the areas to water, noting pots, greenhouse space, borders and lawn separately. Mark paths, obstacles and approximate distances from the water source.
- Choose the main watering job. For a patio of pots, prioritise targeted watering and a practical route to each container. In a greenhouse, consider where plants sit and how to cover the growing area. For borders, note the length and shape of the planting. A mixed garden may need separate zones for pots, beds and lawn.
- Check access. Consider where the water source is and whether the planned system can reach the area you want to water. Keep the route and connection requirements in mind as you compare options.
- Compare the kit contents. Match the listed components and instructions to your sketch, plant positions and intended watering zones. Don’t assume a single kit will cover every area in a mixed garden.
Your routine matters too. If you’re often away or can’t water manually as regularly as your plants need, a timer may help automate a planned schedule when the chosen system supports one. Consider whether you need to adjust the schedule, how the system connects to its water source and how your routine changes with the seasons. Explore garden irrigation water timers to compare options.
Should you start with one zone and expand later?
Starting with one clear priority can make the setup more manageable. You might automate the greenhouse first or set up targeted watering for patio containers, then review what the rest of the garden needs. This keeps the initial layout focused. Before choosing, consider whether suitable components can extend the system, and follow the product instructions when planning additions.
Garden Watering draws on more than 15 years of irrigation experience to offer practical guidance for beginners. Once you’ve identified your main watering job, explore Hozelock automatic watering systems and compare the options with your garden plan.
What are the next steps after choosing a Hozelock starter kit?
Choosing the kit is the first step. Before setting it up, make sure its contents and instructions match the watering job you have in mind. A careful first test helps you spot gaps in coverage and make adjustments before relying on the system as part of your routine.
How should beginners approach setup and the first test?
Use the instructions supplied with your exact kit. They explain how its components fit together and how to arrange the system. Follow the steps in order, then test the connections and check that water reaches each planned area. Observe the outlets while the system runs rather than assuming every plant is receiving water just because the timer or supply is working.
- Review: Lay out the kit contents and compare them with the watering zones you planned.
- Set up: Follow the product instructions, including guidance for connections and component placement.
- Test: Run the system and check how water reaches the plants and surrounding areas.
- Adjust: Make small changes to outlet position or timing based on what you observe and the conditions in your garden.
Plants and growing conditions vary, so treat the first schedule as a starting point. Watch how the soil and plants respond, and refine the timing as needed. A greenhouse, patio and border may each need a different routine, even if they share a water source.
How can a starter setup grow with the garden?
Let your garden’s needs guide any expansion. If you add more pots or extend a border, suitable additional components may help extend the system. A lawn or another area with a different watering job may call for a separate method. Before adding parts or changing the layout, check the product guidance for compatibility and setup requirements. For broader planning, see this guide to Hozelock automatic watering systems.
A starter kit doesn’t need to cover every future need straight away. Begin with the zone that will benefit most, test how well the system works, then decide whether another area needs attention. This keeps changes practical and based on what you observe in your garden.
Garden Watering’s specialist advice draws on more than 15 years of experience with irrigation, giving you a knowledgeable starting point as you compare options. Choose a kit for your main watering task, follow its instructions and expand the setup only as your garden needs it.
Choose a watering setup that works for your garden
The right starter kit begins with the job you need it to do. Match the watering method to your plants and garden layout, then check water access, connections and the exact kit contents before choosing. If different areas have different needs, start with the main watering zone rather than expecting one setup to suit every plant.
Once the system is in place, follow the kit instructions, test where the water reaches and adjust the layout or schedule to suit your garden’s conditions. A few simple checks can make those first decisions more manageable while leaving room to build on the setup as your needs change.
Garden Watering brings more than 15 years of specialist irrigation experience and practical advice to help you select a suitable watering solution. Explore Hozelock watering kits for your garden and choose a practical first step for your plants.
Frequently Asked Questions
Which Hozelock starter kit is best for a beginner?
The best kit depends on what you need to water, your garden layout and access to a water source. Drip watering can suit pots and planted areas where water needs to reach individual plants, while sprinklers provide broader coverage for lawns or open spaces. Check the specific kit’s stated purpose, contents and instructions. Don’t choose by the word “starter” alone; match the kit to the watering job you want to tackle first.
What is usually included in a Hozelock watering starter kit?
There’s no single list of parts because contents vary by watering purpose. One kit may list tubing and outlets, while another may include connectors or a timer. Read the product description and instructions to see exactly what’s supplied. Then compare those parts with your garden plan, including the route from the water source to each watering area. Don’t assume a component is included unless the specific listing says so.
Can a Hozelock starter kit water pots and garden beds?
Some watering approaches can serve both containers and planted areas, but suitability depends on the kit design and your layout. Count your pots, map the beds and consider how far each area is from the water source. A mixed garden may need separate watering zones or different methods, such as targeted delivery for plants and sprinklers for a lawn. Check the kit’s intended use and instructions before planning the setup.
Do I need a water timer for a Hozelock starter kit?
A timer can automate a planned watering routine if it’s compatible with the selected system, but it isn’t essential for every beginner. Consider how often you can water manually, what your plants need and whether you want to adjust the schedule as conditions change. Check the kit’s listed contents to see if a timer is included. Before combining components, read the instructions for both the watering system and timer.
How do I know if a Hozelock kit will fit my garden?
Sketch your garden and mark plants, watering zones and the route from the water source. Note approximate distances, then compare your plan with the kit’s stated purpose, contents and instructions. Garden shape and connection requirements matter as much as overall size: a long route to a border or an awkwardly placed tap may affect your setup. Use this hozelock starter kit selection guide for beginners to check those details before choosing.
Can I expand a Hozelock starter kit later?
You may be able to expand a setup, depending on the original kit, compatible components and the garden’s water supply. Plan for likely extra zones, but don’t assume the system can support additional outlets or that every part will connect. Check product and component guidance before adding parts or changing the layout. Starting with one area and extending gradually can help you learn what your garden needs.
`-
Posted in
drip irrigation, garden irrigation, garden layout, garden watering, Hozelock, hozelock starter kit selection guide for beginners, plant care, starter kit, watering systems