Popup Sprinkler System: The Complete UK Guide to a Lush, Automatic Lawn in 2026
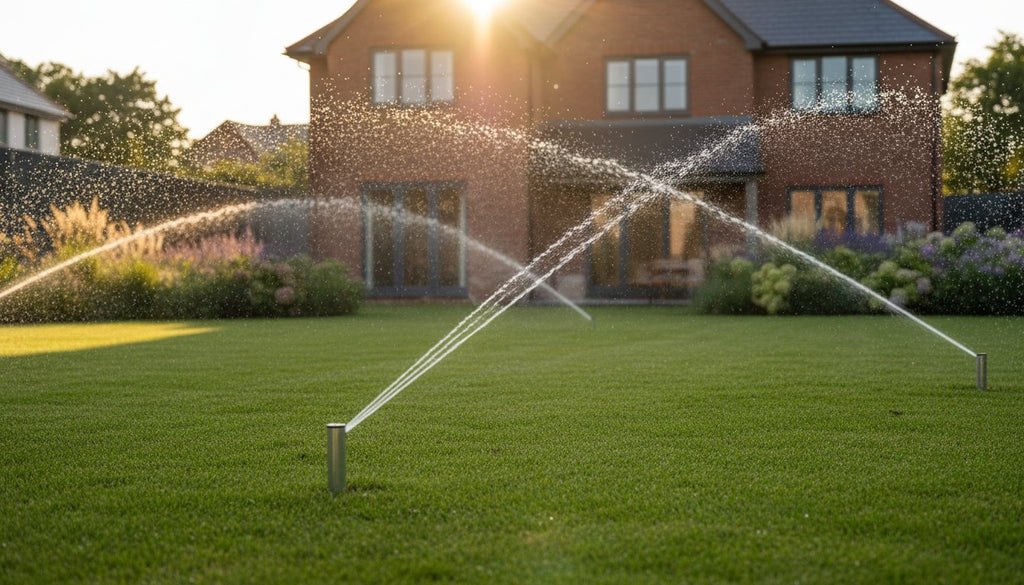
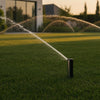
Imagine this: it's a warm July evening. Instead of dragging a tangled hosepipe across the garden, you're relaxing with a cool drink, watching as a perfectly calibrated popup sprinkler system brings your lawn to life. The sprinklers work silently and then disappear back into the turf, completely invisible until they're needed again.
For many UK homeowners, this sounds like a dream. We understand that the reality is often a frustrating cycle of manual watering that results in brown patches and wasted water, not to mention the fear of digging up your lawn and getting it wrong. It's a common worry, but one that shouldn't stop you from achieving a truly effortless, professional-looking garden.
This comprehensive 2026 guide is here to give you the confidence to succeed. We promise to walk you through every expert step of planning, installing, and maintaining a discreet and highly efficient system. You'll learn how to choose the best Hozelock or professional components for your specific needs, ensuring even coverage and a perfectly lush lawn with zero daily effort.
Key Takeaways
- Discover the simple 'bucket test' to accurately measure your home's water flow rate-the critical first step for any successful irrigation plan.
- Understand the professional 'head-to-head' layout principle to ensure complete, gap-free watering and achieve a perfectly lush lawn.
- Learn the key steps for a successful DIY installation of your popup sprinkler system, from lifting turf neatly to selecting the right UK-standard pipe.
- Find out why specialist brands like Hozelock are ideal for UK gardens, offering professional results that are compatible with domestic taps.
What is a Popup Sprinkler System and Why Does Your Lawn Need One?
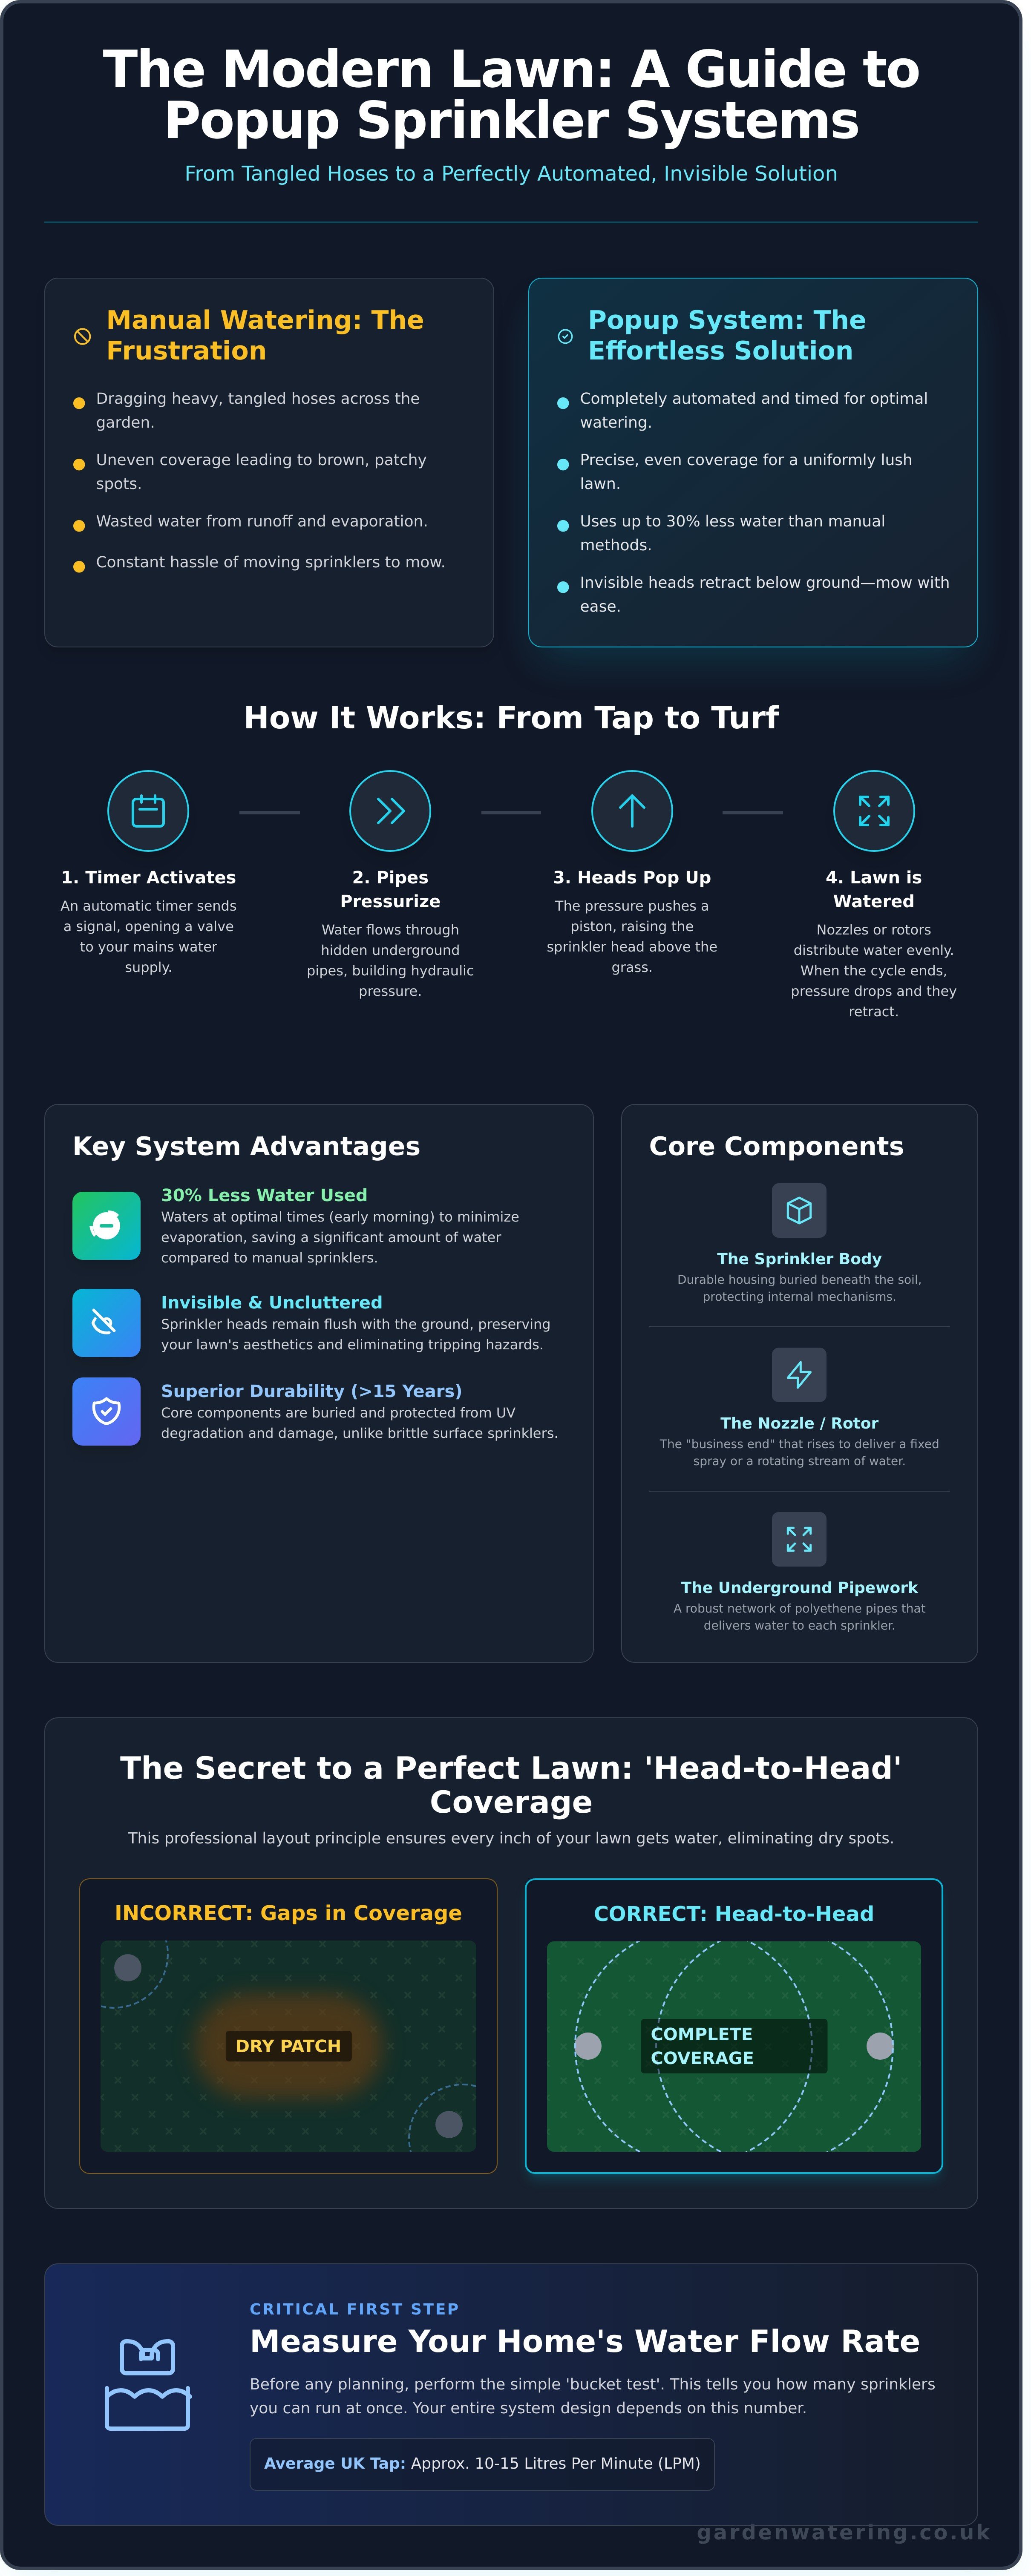
Tired of dragging a tangled hose across your garden every time the sun comes out? A popup sprinkler system is the expert solution for maintaining a lush, healthy lawn with minimal effort. At its core, it's a permanent irrigation network installed discreetly beneath your turf. The sprinkler heads remain flush with the ground, completely hidden from view until it's time to water. When activated by an automatic timer, water pressure causes them to rise, deliver a precise amount of water, and then retract seamlessly back into the ground. No more clutter, no more tripping hazards, just a perfect lawn.
The beauty of this system lies in its efficiency and invisibility. Beyond the obvious aesthetic benefit of a clear, uncluttered lawn, the real advantage is in its performance. A well-designed automatic system can use up to 30% less water than traditional manual sprinklers. This is achieved by watering at optimal times, typically in the early morning when evaporation is lowest, and by delivering water exactly where it's needed, preventing wasteful runoff onto paths and driveways.
With the UK's climate patterns shifting, bringing hotter, drier summers like the one we saw in 2022, water conservation is more critical than ever. Preparing your garden for 2026 and beyond means adopting smarter watering strategies. An automated system provides the precision needed to comply with potential hosepipe bans while ensuring your lawn doesn't just survive, but thrives.
The Core Components of a Discreet System
Understanding the simple, high-quality parts of a popup sprinkler system helps demystify how it works so effectively:
- The Sprinkler Body: This is the durable housing buried safely beneath the soil. It protects the delicate internal mechanisms from lawnmowers, foot traffic, and the elements, ensuring long-term reliability.
- The Nozzle or Rotor: This is the 'business end' that rises above the ground. Nozzles produce a fixed fan-like spray for smaller areas, while rotors turn to cover larger distances, allowing for a customised solution for any lawn shape.
- The Underground Pipework: Think of these high-quality polyethene pipes as the arteries of your system. They connect to your mains water supply and deliver water efficiently to each sprinkler body, forming a robust and hidden network.
Popup vs. Surface Sprinklers: The Real-World Comparison
While a simple surface sprinkler might seem like an easy fix, a permanent underground system offers superior performance and convenience in every key area:
- Durability: Plastic surface sprinklers are constantly exposed to UV sunlight, which makes them brittle over time. A popup system's core components are buried, protecting them from degradation and accidental damage for a lifespan that can exceed 15 years with proper care.
- Mowing Convenience: This is a game-changer. You'll never have to move a sprinkler or wind up a hose before cutting the grass again. The heads are safely retracted below the level of your mower blades, saving you time and hassle every week.
- Uniformity: The key to eliminating brown, patchy spots is achieving 'Head-to-Head' coverage, where the spray from one sprinkler reaches the base of the next. This professional layout guarantees every inch of your lawn receives consistent hydration. Understanding the basics of how irrigation sprinklers work shows why this methodical design is far superior to the often-uneven pattern of a single surface sprinkler.
How a Popup Sprinkler System Works: From Tap to Turf
At first glance, a popup sprinkler system seems like magic. One moment your lawn is clear, the next it's being watered by a series of perfectly placed sprinklers that appeared from nowhere. The reality is a simple yet brilliant combination of water pressure, clever mechanics, and automated control. Let's break down exactly how your system turns a simple tap into a thriving, green lawn.
The core principle is hydraulics. When the system is activated, water from your mains supply flows into the underground pipes. This pressurised water pushes up a piston inside the sprinkler body, causing the head to rise, or 'pop up', above the grass. Once the water is turned off, the pressure drops, and a spring retracts the head safely back below ground, out of sight and away from lawnmower blades.
This leads to the most common question we hear: why can't I just run 20 sprinklers from my garden tap? The answer is flow rate and pressure. Your average UK home's outdoor tap provides about 10-15 litres per minute (LPM) at 2-3 bar of pressure. A single rotating sprinkler can easily use 8 LPM by itself. Running too many sprinklers at once would result in a weak, ineffective dribble. To solve this, we divide the garden into 'zones', groups of sprinklers that run one after the other, ensuring each one gets the pressure it needs for optimal coverage.
Spray Nozzles vs. Rotating Rotors
Choosing the right sprinkler head is crucial for efficiency. Sprinklers aren't one-size-fits-all; they are specialist tools for different areas of your garden.
- Spray Heads: These deliver a fixed, fan-like spray of water. They are perfect for smaller, more intricate lawn shapes and garden borders, typically covering distances of 2 to 5 metres.
- Rotors: Ideal for large, open spaces, rotors shoot a single stream of water while rotating. They can cover much greater distances, often from 5 to 15 metres, making them highly efficient for expansive lawns.
- MP Rotators: This modern hybrid delivers multiple rotating streams of water at a lower rate. They are exceptionally efficient, work well in low-pressure situations, and are excellent for slopes as they reduce water runoff.
The Brain of the System: Controllers and Solenoids
Automation is what makes a popup sprinkler system so convenient. This is managed by a controller, which acts as the system's brain, and solenoid valves, which act as automated gates for each zone. A simple tap-mounted timer might control a single line of sprinklers, but for a multi-zone system, a wall-mounted controller is essential. It sends a low-voltage electrical signal to a specific solenoid valve, telling it to open and allow water to flow to that zone. Modern smart controllers even connect to Wi-Fi, allowing you to manage your watering from a phone app and integrate rain sensors that automatically pause the schedule when it's wet.
The controller also allows you to automate watering during the 'golden hour'-early in the morning. Watering between 4 am and 7 am is far more efficient. The air is cooler and calmer, meaning less water is lost to evaporation and wind. This simple scheduling is a cornerstone of effective and water-saving lawn care, ensuring every drop counts.
Finally, safety is paramount. In the UK, it is a legal requirement under the Water Supply (Water Fittings) Regulations 1999 to prevent any risk of contaminating the public water supply. Every professionally installed popup sprinkler system must include a backflow prevention device, typically a WRAS-approved double check valve. This ensures that no water from your garden, potentially containing fertilisers or pesticides, can ever siphon back into your home's drinking water. Using WRAS-approved components is a mark of a high-quality, safe, and legally compliant installation. Understanding these parts demystifies the process, and our team is always ready to help you design the perfect system for your lawn.
Planning Your Layout: The Secret to Professional Results
A lush, evenly green lawn doesn't happen by accident. The secret lies in careful planning before a single pipe is laid. A well-designed layout ensures every blade of grass gets the water it needs without wasting a drop on your patio or driveway. Taking the time to map your system is the single most important step towards achieving efficient, professional-grade watering. It's how you transform a simple set of parts into a high-performance popup sprinkler system.
Before you can plan, you need to know what your water supply can handle. This is the foundation of your entire design.
The Bucket Test: Calculating Your Domestic Flow
Your home's water pressure (measured in PSI or Bar) is not the same as its flow rate. Pressure is the force, but flow rate is the volume of water available over time, measured in Litres Per Minute (LPM). This figure dictates how many sprinkler heads you can run at once. Here’s how to measure it in under a minute:
- Step 1: Get a bucket with a known volume, like a standard 10-litre builder's bucket.
- Step 2: Turn your outside tap on fully.
- Step 3: Time exactly how many seconds it takes to fill the bucket.
- Step 4: Use this simple calculation: (Bucket Size in Litres ÷ Seconds to Fill) x 60 = Your Flow Rate in LPM.
For example, if it takes 30 seconds to fill a 10-litre bucket: (10 ÷ 30) x 60 = 20 LPM. Most UK properties have a flow rate between 20 and 40 LPM. This number is your budget; you can't spend more water than you have in any single watering zone.
Sketching the Perfect Watering Map
With your flow rate calculated, it's time to become a garden architect. Grab some grid paper or use a free online garden planning tool. Start by drawing your property's outline, including the house, paths, shed, and any large trees. Then, begin placing your sprinklers.
The golden rule of sprinkler placement is 'head-to-head coverage'. This means the spray from one sprinkler must reach the base of the next. This overlap is critical; without it, you'll end up with frustrating dry patches between spray circles. To avoid over-spraying paths, use quarter-circle heads in corners and half-circle heads along straight edges. For tricky curved edges, adjustable arc nozzles give you complete control.
Your plan must also group sprinklers into 'zones'. A zone is a set of sprinklers that run at the same time from one valve. The total water usage of all heads in a zone cannot exceed about 80% of your measured LPM. For a 20 LPM supply, a zone's total demand should be no more than 16 LPM. Group areas with similar needs together; a shady, damp part of the lawn needs a different watering schedule than a patch in full sun, so they should be on separate zones.
Finally, consider pipe friction loss. Water loses a small amount of pressure as it travels through pipes. For the last sprinkler in a long line to pop up effectively, keep pipe runs for each zone under 50 metres. This ensures the head furthest from the valve has enough power to deliver an even spray, completing your professional layout.
Installation and Maintenance: A DIY Reality Check
Installing your own popup sprinkler system is a truly rewarding project that can be tackled over a long weekend. With careful planning and the right techniques, you can achieve a professional-grade result that saves you time and keeps your lawn lush. The key is to work methodically and understand the crucial steps that ensure longevity and performance.
The most daunting task is often the trenching, but it doesn't have to ruin your lawn. The best method is to create 'turf bricks'. Use a sharp spade to cut a line where your pipe will go, then cut across it every 30-40cm. You can then slide the spade underneath and lift out neat sections of turf with the soil attached. Place these on a plastic sheet next to the trench, and they can be replaced perfectly later with minimal scarring.
For the pipework itself, the UK standard for underground irrigation is 25mm MDPE (Medium-Density Polyethylene) pipe. This robust blue or black pipe is specifically designed for mains water and is highly resistant to frost and ground pressure. When it comes to attaching the sprinkler heads, don't connect them directly to the MDPE. Instead, use flexible 'Swing Pipe'. This specialised tubing provides a flexible connection that allows you to set the sprinkler head at the perfect height, flush with the soil. It also acts as a shock absorber, protecting the main pipe from damage if a head is run over by a lawnmower or stepped on.
Before you backfill the trenches, the testing phase is absolutely critical. With the sprinkler nozzles removed, connect your water supply and flush the entire system for several minutes. This forces out any dirt, soil, or plastic shavings that may have entered the pipes during cutting and assembly. Skipping this step is the number one cause of clogged nozzles. Once flushed, you can install the nozzles, test the spray patterns, and then carefully backfill the trenches and replace your turf bricks.
The DIY Installation Timeline
A typical DIY installation can be broken down into a three-day plan. Day 1 is for preparation: finalising your layout, marking the pipe runs and sprinkler locations with string or spray paint, and completing the most physically demanding job of digging the trenches. Day 2 involves the technical work: laying the 25mm MDPE pipe, cutting it to length, and fitting all the compression connectors and sprinkler bodies. On Day 3, you'll conduct the system flush, install the nozzles, test for leaks, adjust spray arcs, and finally, backfill the trenches and neatly replace the turf.
Winterisation: Protecting Your Investment from UK Frost
Protecting your popup sprinkler system from the UK's winter frost is essential to prevent cracked pipes and damaged components. You have two main options for winterising your system:
- The 'Blow-Out' Method: This is the most thorough technique, used by professionals. It involves using an air compressor to force all water out of the pipes and sprinkler heads. It's highly effective but requires care; using a pressure above 50 PSI can damage your system. For expert advice on the right components for your garden, explore our complete range of high-quality irrigation kits and parts.
- Automatic Drain Valves: A fantastic, low-maintenance solution for many UK gardens. These small valves are installed at the lowest points of your pipe network. When the system is turned off and the water pressure drops, the valves automatically open, allowing water to drain safely into the ground via gravity.
Come spring, follow a simple startup checklist: reopen the main water valve slowly to allow pipes to fill gradually, check every connection for leaks, clean the main system filter, and inspect each sprinkler head to ensure its spray pattern is correct and unobstructed.
Choosing the Right Popup System: Why Hozelock is the UK Specialist's Choice
Selecting the right components for your garden irrigation can feel daunting, but for UK gardens, one brand consistently proves to be the ideal choice. Unlike industrial-grade systems that require professional installation and high-pressure mains, our recommended systems are built on a DIY-friendly philosophy. They deliver professional, reliable results without the complexity, making a lush, healthy lawn achievable for everyone.
One of these systems' greatest strengths is its seamless compatibility with UK infrastructure. Every component, from the timer to the supply pipe connectors, is designed to work perfectly with the standard 3/4" BSP outdoor tap found on virtually every home in Britain. There's no need for expensive adaptors or specialist plumbing work; it’s a plug-and-play solution designed for you.
This leads to what we call the 'Volumetric Advantage'. This brand engineers its kits specifically for the typical UK domestic water pressure, which generally sits between 2 and 4 bar. Many systems, particularly those designed for the US market, demand higher pressure to function correctly. Their sprinklers, however, are optimised to provide excellent coverage and performance within this specific pressure range. This means your popup sprinkler system will work efficiently right out of the box, saving you water and ensuring an even, green lawn without needing a booster pump.
Finally, where you buy matters. While you might find basic kits in general DIY stores, purchasing from a specialist like Garden Watering gives you access to expert advice. We don't just sell boxes; we provide tailored solutions. We understand the nuances of a complete popup sprinkler system, from calculating flow rates to planning complex zones, ensuring you get the right parts first time.
Automatic Watering Kits vs. Custom Builds
For standard rectangular or square lawns up to 280m², an Automatic Watering Kit from a reputable manufacturer is a fantastic, cost-effective solution. It contains everything you need in one box. However, for L-shaped lawns, gardens with separate zones like borders and patios, or multi-level areas, a custom build offers greater flexibility. By selecting components individually, you can create a highly efficient system tailored precisely to your garden's unique layout. Key products to look for include the smart Sensor Controller for weather-responsive watering and the durable Pro range of sprinklers and connectors.
Final Checklist Before You Buy
- Confirm your flow rate: Perform the bucket test one last time to be absolutely certain your system design matches what your water supply can deliver. This is the most critical step for success.
- Check your parts list: Double-check that you have all the necessary connectors, elbows, T-pieces, and manifold components for the number of zones you've planned. It’s always better to have one or two extra than to be one short.
- Plan your next step: With your plan finalised and your checklist complete, you’re ready to get the best equipment for the job.
Ready to build a system that will keep your garden thriving for years to come? Browse our exclusive Popup Sprinkler range and get expert irrigation advice you can trust.
Your Expert Path to a Greener, Automated Lawn
You've seen how a popup sprinkler system can transform your lawn care, saving you time while delivering precise, even watering right at the roots. The secret to success, as we've covered, lies in smart layout planning. It's the difference between a good result and a truly professional one, ensuring every blade of grass gets the hydration it needs to thrive.
Making the right choice is simple when you have the right partner. As exclusive Hozelock specialists with over 15 years of dedicated irrigation expertise, we're here to help. We provide free UK expert advice on all system designs to ensure you get it right the first time. Explore our complete range and get the support you need from the UK's trusted irrigation partner.
Shop Hozelock Popup Sprinkler Systems & Kits
Your beautiful, effortlessly green lawn is closer than you think.
Frequently Asked Questions
Can I run a popup sprinkler system off a standard garden tap?
Yes, you can run many popup sprinkler systems directly from a standard UK garden tap. High-quality kits, like those from Hozelock, are specifically designed for this purpose. For them to work effectively, your tap should provide a minimum water pressure of 1.5 bar and a flow rate of at least 20 litres per minute. Most domestic water supplies in the UK easily meet these requirements, making installation straightforward.
How deep do I need to bury the pipes for a lawn sprinkler system?
You should bury the pipes for your lawn sprinkler system at a depth of 15cm to 25cm, or about the depth of a spade's blade. This is deep enough to protect the pipework from damage caused by routine lawn care activities like aeration or scarifying. It also provides insulation against frost during colder months, ensuring your system remains safe and functional year after year. This depth keeps everything discreet and effective.
Will a popup sprinkler system work if I have low water pressure?
A popup sprinkler system can still be an efficient solution even with low water pressure, provided you select the right components. If your pressure is below 1.5 bar, you'll need to use specialised low-pressure sprinkler heads or design your layout with smaller zones and fewer sprinklers per line. For properties with persistently low pressure, installing a simple water pump is a reliable way to boost performance and ensure even coverage for a lush, healthy lawn.
How many sprinkler heads can I run on one zone?
The number of sprinkler heads you can run on a single zone is determined by your home's water flow rate and pressure. A typical UK household with a flow rate of 25 litres per minute and 2.5 bar of pressure can usually support between 3 and 5 pop-up sprinklers. Before you design your system, it's essential to measure your flow rate. This calculation ensures each zone operates efficiently and your lawn receives the even watering it needs to thrive.
Do I need to take the sprinklers out in the winter?
No, you don't need to remove your sprinkler heads during the winter. Instead, you should "winterise" the system to protect it from frost. This simple process involves shutting off the main water supply to the system and draining all the water from the pipes. This is often done using an airline to blow the water out or by installing automatic drain valves at low points, preventing the water from freezing, expanding, and cracking the pipes.
What is the best time of day to set my automatic sprinkler for?
The best time to set your automatic sprinkler is in the early morning, ideally between 4 am and 7 am. Watering at this time is far more efficient as cooler temperatures and calmer winds mean less water is lost to evaporation. This timing also allows the grass blades to dry completely during the day, which significantly reduces the risk of fungal diseases developing. It's a simple change that saves water and promotes a healthier lawn.
How much does a DIY popup sprinkler system cost to install in the UK?
The cost for a DIY popup sprinkler system in the UK typically ranges from £200 to £600 for an average-sized garden. For example, a complete kit for a 100-square-metre lawn often starts around the £250 mark. The final price depends on factors like the lawn's complexity, the number of zones you need, and the quality of the components you choose. Investing in a reliable brand ensures your system will perform effectively for years to come.
Can I install a popup system myself or do I need a plumber?
Yes, you can absolutely install a popup system yourself without hiring a plumber. Modern irrigation kits are specifically created for easy DIY installation, featuring push-fit connectors and step-by-step guides. Since the system connects directly to a standard outdoor garden tap, it doesn't involve any complex mains plumbing. For most homeowners, it’s a very manageable weekend project that delivers professional results and saves you hundreds of pounds in labour costs.
`-
Posted in
popup sprinkler system